
Understanding Vapor Barrier Installation
What is a Vapor Barrier?
A vapor barrier is a material designed to prevent the migration of moisture in the form of vapor in the air. Typically installed in the crawl space or basement of a home, vapor barriers are crucial for protecting the structural integrity of the building. They work by blocking humidity from the ground and preventing moisture from rising into the living spaces above. Common materials used for vapor barriers include polyethylene sheets, foil, and specialized coatings. They play a vital role in maintaining a dry environment, which can significantly enhance indoor air quality and comfort.
Importance of Vapor Barrier Installation
The installation of a vapor barrier is not merely an option; it’s a necessity for homeowners looking to protect their space from the adverse effects of moisture. Without an adequate vapor barrier, crawl spaces can become a breeding ground for mold, mildew, and wood rot. These issues can lead to significant health problems and costly repairs. A properly installed vapor barrier also helps to enhance the energy efficiency of your home by reducing the workload on heating and cooling systems. By doing so, it contributes to lower energy bills and a more comfortable living environment. Therefore, investing in Vapor Barrier Installation is essential for long-term home maintenance.
Materials Used in Vapor Barriers
Various materials can be employed for vapor barriers, each with its advantages and appropriate applications. Polyethylene sheets, particularly those that are at least 6 millimeters thick, are among the most common choices due to their effectiveness and affordability. Foil-faced materials can also serve as an excellent option for reflecting heat while preventing vapor transfer. Moreover, there are coatings available that can be applied directly to surfaces to create a vapor-retardant layer. Selecting the right material depends on factors such as climate, soil humidity, and the specific needs of your crawl space or basement.
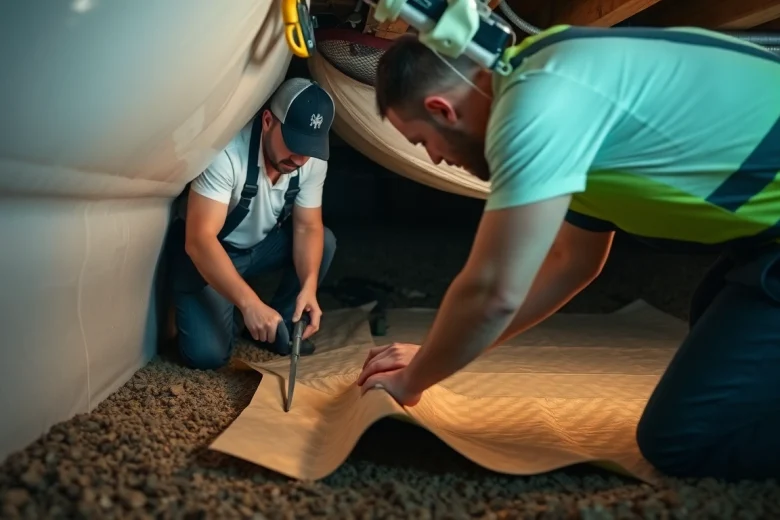
Preparation for Installation
Tools Required for Vapor Barrier Installation
Before beginning the installation process, it is essential to gather the necessary tools. Essential tools for vapor barrier installation include a utility knife for cutting the barrier material, a measuring tape for accurate sizing, staples or adhesive for securing the barrier, and safety gear like gloves and a mask. Depending on the specifics of your installation, you might also need a straight edge for cutting, a level for ensuring proper alignment, and possibly a broom or vacuum for cleaning the area. Having all tools on hand before starting will make the process smoother and more efficient.
Site Assessment and Cleaning
Conducting a site assessment is a crucial step in the preparation process. Inspect the crawl space for any signs of moisture damage, mold growth, or pest infestations. This assessment will help you determine the extent of potential issues that might require attention before you install the vapor barrier. After assessment, ensure that the crawl space is clean and dry. Remove any debris, old insulation, or other obstacles that could hinder the installation. A clean surface will enhance the adhesion of the vapor barrier and contribute to its effectiveness.
Measuring the Crawl Space
Accurate measurements of the crawl space dimensions are vital for effective vapor barrier installation. Use a measuring tape to obtain the length and width of the area, and consider measuring the height to determine the appropriate height for the barrier installation. Always add a few extra inches to your measurements to allow for overlaps and secure anchoring to the walls. Documenting these dimensions will make the cutting process quicker and more accurate and ensure a seamless fit that enhances moisture control.
Step-by-Step Vapor Barrier Installation Process
Securing the Edges and Corners
Once the vapor barrier material is cut according to the measurements, it’s time to lay it down. Start in one corner of the crawl space, making sure to extend the material slightly up the walls. Use staples, nails, or adhesive to secure the edges of the vapor barrier to the ground and the walls to create a tight seal. Pay special attention to corners and overlaps to minimize any potential gaps where moisture could infiltrate. Sealing these areas properly will significantly enhance the barrier’s effectiveness.
Using Appropriate Adhesives
Choosing the right adhesive is crucial for securing the vapor barrier effectively. Many professionals recommend using a construction-grade adhesive suitable for the material of your vapor barrier. It should provide a strong bond that can withstand moisture exposure. In some cases, double-sided tape can also be used for additional securing, especially in areas where staples might not be suitable. Always refer to the manufacturer’s instructions for the adhesive to ensure compatibility and optimal performance.
Common Mistakes to Avoid
During installation, there are several common mistakes to be aware of. One of the most prevalent is underestimating the importance of overlapping sections of the vapor barrier. Always overlap sections by at least 12 inches to ensure continuous coverage. Additionally, avoid installing the vapor barrier in damp areas without addressing drainage problems first. Failing to clean the crawl space thoroughly can also lead to complications, as any leftover moisture or debris can undermine the barrier’s effectiveness. Taking the time to do it right the first time saves time and expense in the long run.
Maintenance and Inspection
How to Inspect Your Vapor Barrier
Regular inspection of your vapor barrier is essential for ensuring its integrity over time. Look for any signs of damage, such as tears, punctures, or areas where it may have become unsealed. It’s advisable to perform inspections at least once a year or after significant weather events that could affect moisture levels in your crawl space. During the inspection, check for any signs of mold or mildew that may indicate moisture infiltration.
Signs You Need Repair
If you notice fraying, tears, or noticeable discolored patches on your vapor barrier, it may need repairs or replacement. Another sign that repair is needed is a persistent damp smell in the crawl space or any visible growth of mold or mildew. Additionally, if you observe puddling or condensation accumulating on the surface of the barrier, this indicates that moisture is getting through, and immediate action is required to ensure the space remains dry.
Longevity of Vapor Barriers
The lifespan of a vapor barrier largely depends on the materials used and the environmental conditions to which it is exposed. Most polyethylene vapor barriers can last for 15 to 30 years if adequately installed and maintained. However, extreme conditions or neglect can shorten their lifespan significantly. Regular inspections can help identify any potential issues early, allowing for repairs before they escalate.
Frequently Asked Questions About Vapor Barrier Installation
How long does a vapor barrier last?
A vapor barrier can typically last between 15 to 30 years, depending on factors like material quality and environmental conditions. Regular maintenance can extend its lifespan.
Can I install a vapor barrier myself?
Yes, a vapor barrier can be installed by a diligent homeowner with basic tools and skills. Following instructions meticulously is crucial for proper installation.
What are the benefits of proper installation?
Proper installation of a vapor barrier helps prevent moisture intrusion, reduces the risk of mold and mildew, enhances energy efficiency, and protects the structural integrity of your home.
How does a vapor barrier affect home energy efficiency?
A vapor barrier reduces humidity levels, minimizing the load on heating and cooling systems, which can lead to significant energy savings and improved indoor comfort.
What happens if a vapor barrier is installed incorrectly?
If a vapor barrier is not installed correctly, it can allow moisture intrusion, leading to mold growth, structural damage, and decreased energy efficiency. Regular inspections are vital to prevent these issues.